You can create an email campaign, select multiple recipients, design and schedule the email, and track responses.
This article covers:
Creating email campaigns
- Click Marketing → Email campaigns:
- Click New email campaign:
- The “Let’s send some great emails” window displays:
- You can either enter details manually, or click Tell us what you want to write about and click Generate content based on description for Upsales to generate some words:
-
Add the Internal email campaign name. This is for you to search or identify the campaign later. It's only visible to your Upsales users. By default it shows as the subject line for emails, which you can change before you send it out.
Naming: An easy-to-remember and scalable method is the 3-part approach:
Webinar - Product Release - 2024-Q3.- Part 1: Campaign type, eg webinar, product release, newsletter.
- Part 2: Feature
- Part 3: Year or quarter. This format allows text to be sorted by date.
-
Add the type of email. These relate to the subscription type. The email will have a link on the footer to unsubscribe. This link will bring the receiver to a page with a list of the Email types from which they can choose to unsubscribe.
Unsubscribed email addresses can still receive form submissions
- Click Next: Templates & design:
The template gallery displays.
Setting up email campaigns
Setting up the new email campaign is divided into:
Switch between steps by clicking the tabs at the top of the screen:
1. Design an email campaign
- Click to choose templates you've created, from recent email campaigns, Upsales templates, or start with an empty template:
- Hover over your chosen template and click Select:
-
You can now edit your email template.
We recommend editing directly within the template. Pasting text from other apps, such as Word or Google Docs, may mean you also paste extra html which can alter formatting
-
When you work with an existing template, click an element and the editing options appear automatically:
The font editor only includes fonts that are likely to be installed on your recipient's computer. This is to make sure your fonts will display and render correctly. That's why other types, including custom fonts, aren't included.
- Click Preview to view the email, or click Send test to send a test email. You can also click Share link to share the draft email (click paste to show the draft email's URL):
- When you're happy with the email, click Next step:
1.1 How to manually add an unsubscribe link to your email
The unsubscribe link is always included by default. Removed it by accident? Here's how to add it again:
- Add a row
- Click a column inside the row and add the content type Text:
- Click Insert tag:
-
Scroll or search available tags for End subscription:
To only display the unsubscribe page URL, add: {{UNSUB}}
2. Selecting recipients
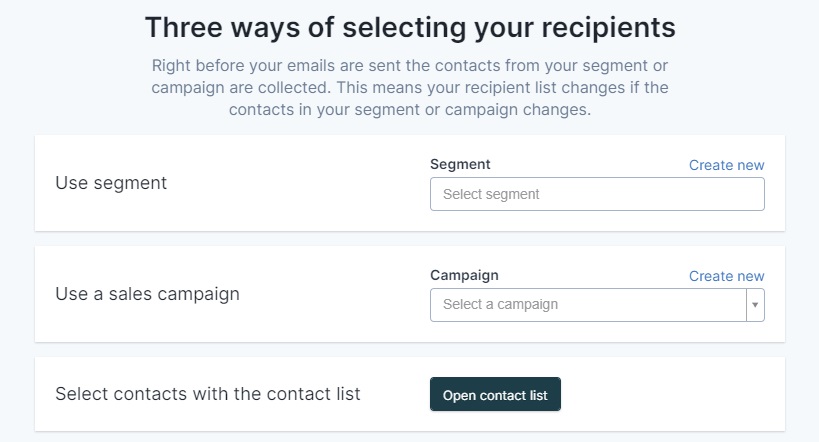
- There are three ways to select your recipients. You can either click the field and search, or click to create new:
- Segments
- Sales campaigns
- Contact lists
- After you've chosen, Upsales gives you a summary of your recipient data:
- When you're happy with the health of your list, click Next step:
3. Updating settings and sending emails
It's now time to complete the final settings:
- Internal email campaign name:
- The sender profile:
- Choose the sender by clicking the dropdown
-
Add a subject – click tags to add a tag such as the contact's first name for added personalisation. Hover over the tag you want, click Copy and paste into your subject line:
Sending an email to multiple contacts with the same email address? Any personalisation tags will display details of the contact you've had the most recent activity with.
- Add pre-header text. This is the text recipients may see in their inbox before they open the email. Leave it blank and users will see the first few words in your email.
- Review the recipients:
- Review the links in the email, to make sure they're going to the right place:
- Add attachments (maximum combined total of 15mb)
- Choose to send or schedule your email:
4. Scheduling emails
When you click Schedule send, click in the date and time fields to choose when to send the email. You can change this any time up until two minutes before the scheduled time:
Finding email campaigns
You can always return to emails that are drafted, scheduled or sent.
- Click Marketing→ Email campaigns:
- Click the dropdown next to My email campaigns or toggle the Sent & scheduled and Draft tabs:
-
Sort by columns with arrows:
- You can also use the search bar and filters to find your email campaign:
-
Customise the columns shown for the list:
- To re-use or adapt a sent email (instead of starting from scratch) click the copy icon: